hvigor 构建工具是一款基于 TypeScript 实现的构建任务编排工具,主要提供任务管理机制,包括任务注册编排、工程模型管理、配置管理等关键能力,提供专用于构建和测试应用的流程和可配置设置。DevEco Studio 使用构建工具 hvigor 来自动执行和管理构建流程,实现应用/服务构建任务流的执行,完成 HAP/APP 的构建打包。

hvigor 允许开发者实现自己的插件,开发者可以定义自己的构建逻辑。目前主要提供了两种方式来实现插件:基于hvigorfile脚本开发插件 和 基于typescript项目开发。主要的区别就是代码是直接放在 hvigorfile.ts 里面还是将逻辑放在一个独立的 npm 库里面然后再 hvigorfile.ts 里面接入使用。
为了方便快速初始化项目我做了一个模板工程 hvigor_plugin_template ,免去一些项目初始化的操作。
开发
开发一个插件最核心的代码是下面的代码:
import { HvigorNode, HvigorPlugin } from '@ohos/hvigor';

export function customPlugin(): HvigorPlugin {
    return {
        pluginId: 'customPlugin',
        apply(node: HvigorNode) {
            console.log(`node: ${node.getNodeName()}, path: ${node.getNodePath()}`);
            console.log('hello customPlugin!');
        }
    }
}
上面的代码本质上是将函数 customPlugin 导出给外部使用(注册插件就是方法调用的过程),这个函数最终返回的是 HvigorPlugin 定义如下:
/**
 * HvigorPlugin定义声明
 */
export interface HvigorPlugin {
    /**
     * 插件的唯一标示ID
     */
    pluginId: string;
    /**
     * 插件元数据定义
     */
    context?: (() => any) | any;
    /**
     * 插件的主体方法,定义插件实现逻辑(例如任务注册等)
     * 在hvigor的生命周期配置阶段调用,进行task的注册
     *
     * @param node
     */
    apply: (node: HvigorNode) => void | Promise<void>;
}
HvigorPlugin 主要有三个参数pluginId、context、apply:
(1)pluginId:[必填]插件的唯一标示ID
(2)context:[非必填]插件元数据定义(暂未深入研究)
(3)apply: [必填]插件的主体方法,业务逻辑写在 apply 里面, 这里只有一个参数 HvigorNode (Hvigor Plugin 扩展接口),主要提供的接口如下:
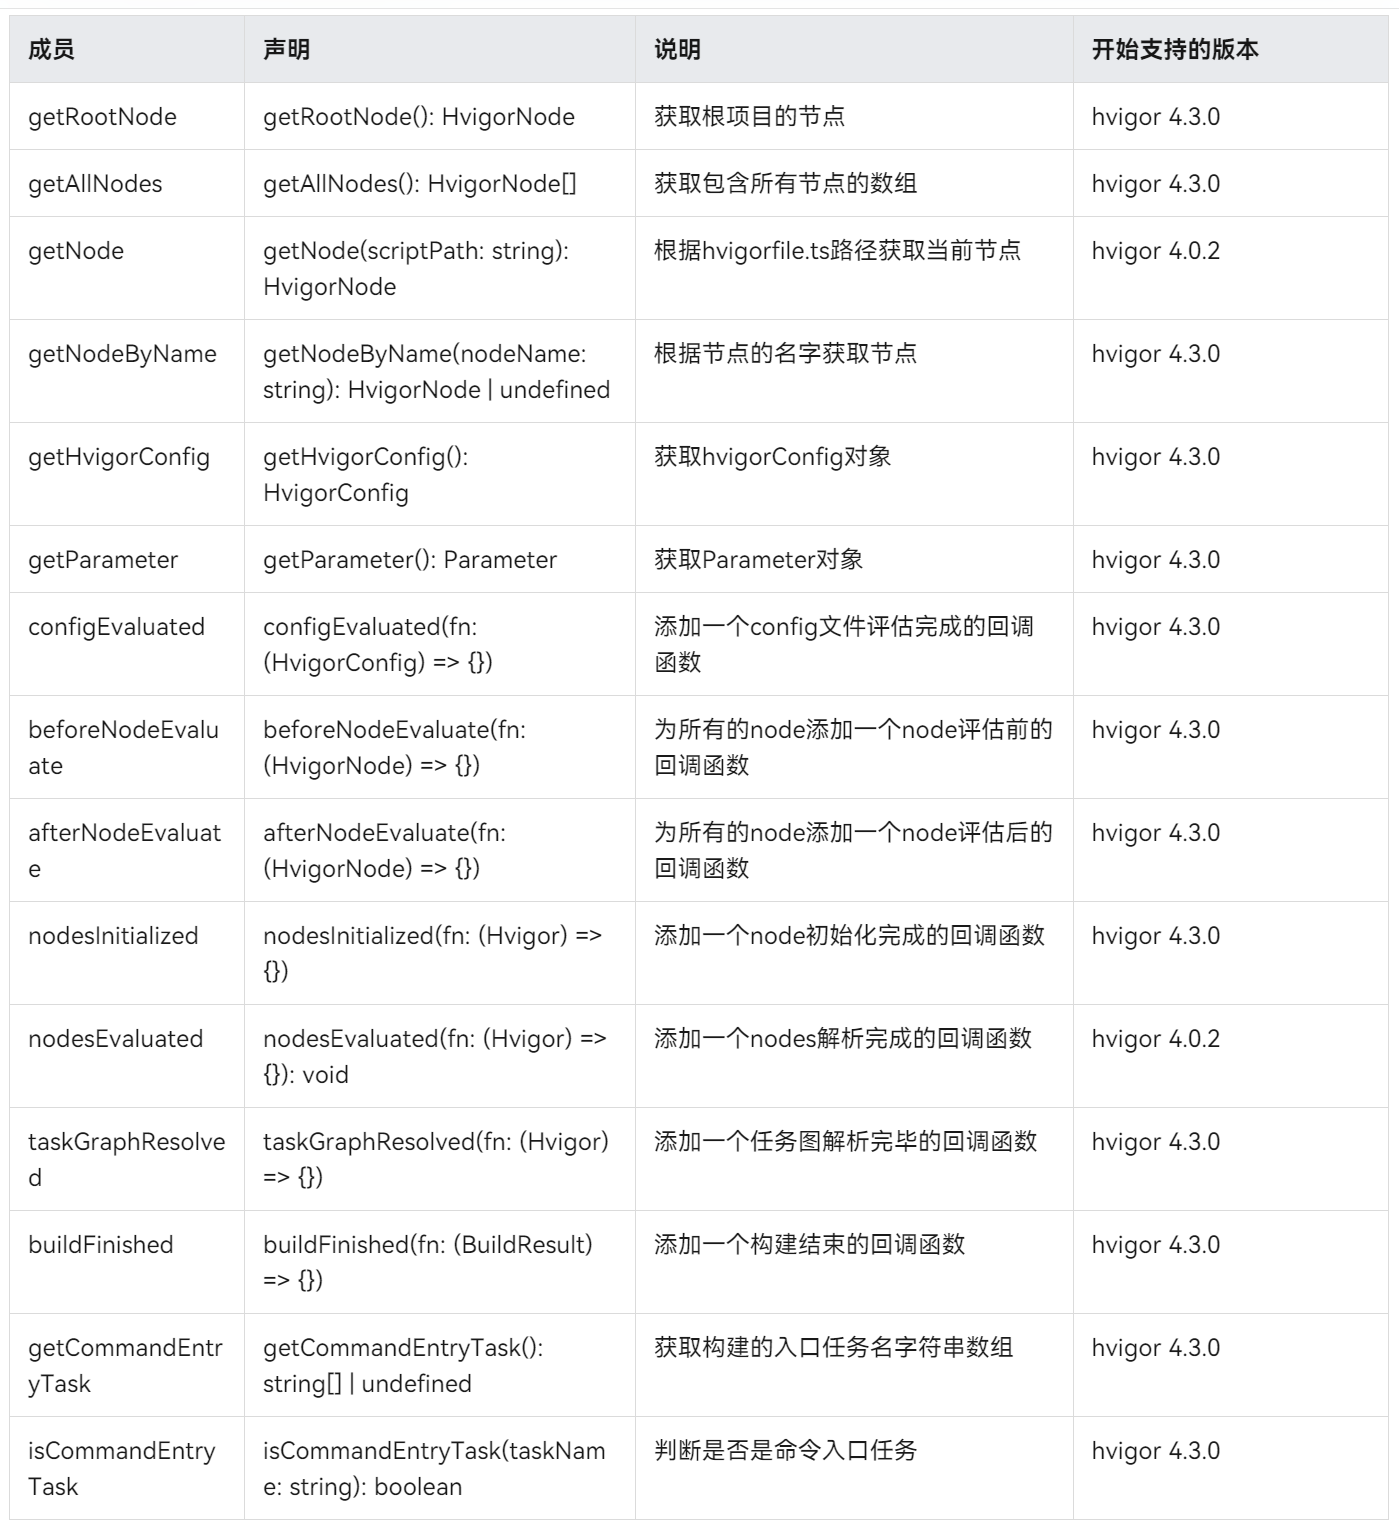
比如可以通过如下代码获取当前正在操作的模块所在的路径:
const modulePath = node.getNodePath()
console.log(`模块目录:${modulePath}`);
然后就可以通过一些纯JS的代码实现目录文件相关扫描
const scanDir = modulePath + options.scanDir;
fs.readdirSync(scanDir).forEach((file) => {
    const fullPath = path.join(scanDir, file);
    const stats = fs.lstatSync(fullPath)
    if (stats.isFile() && (file !== '.DS_Store' && fullPath.endsWith(".ets"))) {
        console.log(`文件路径: ${fullPath}`)
    }
})
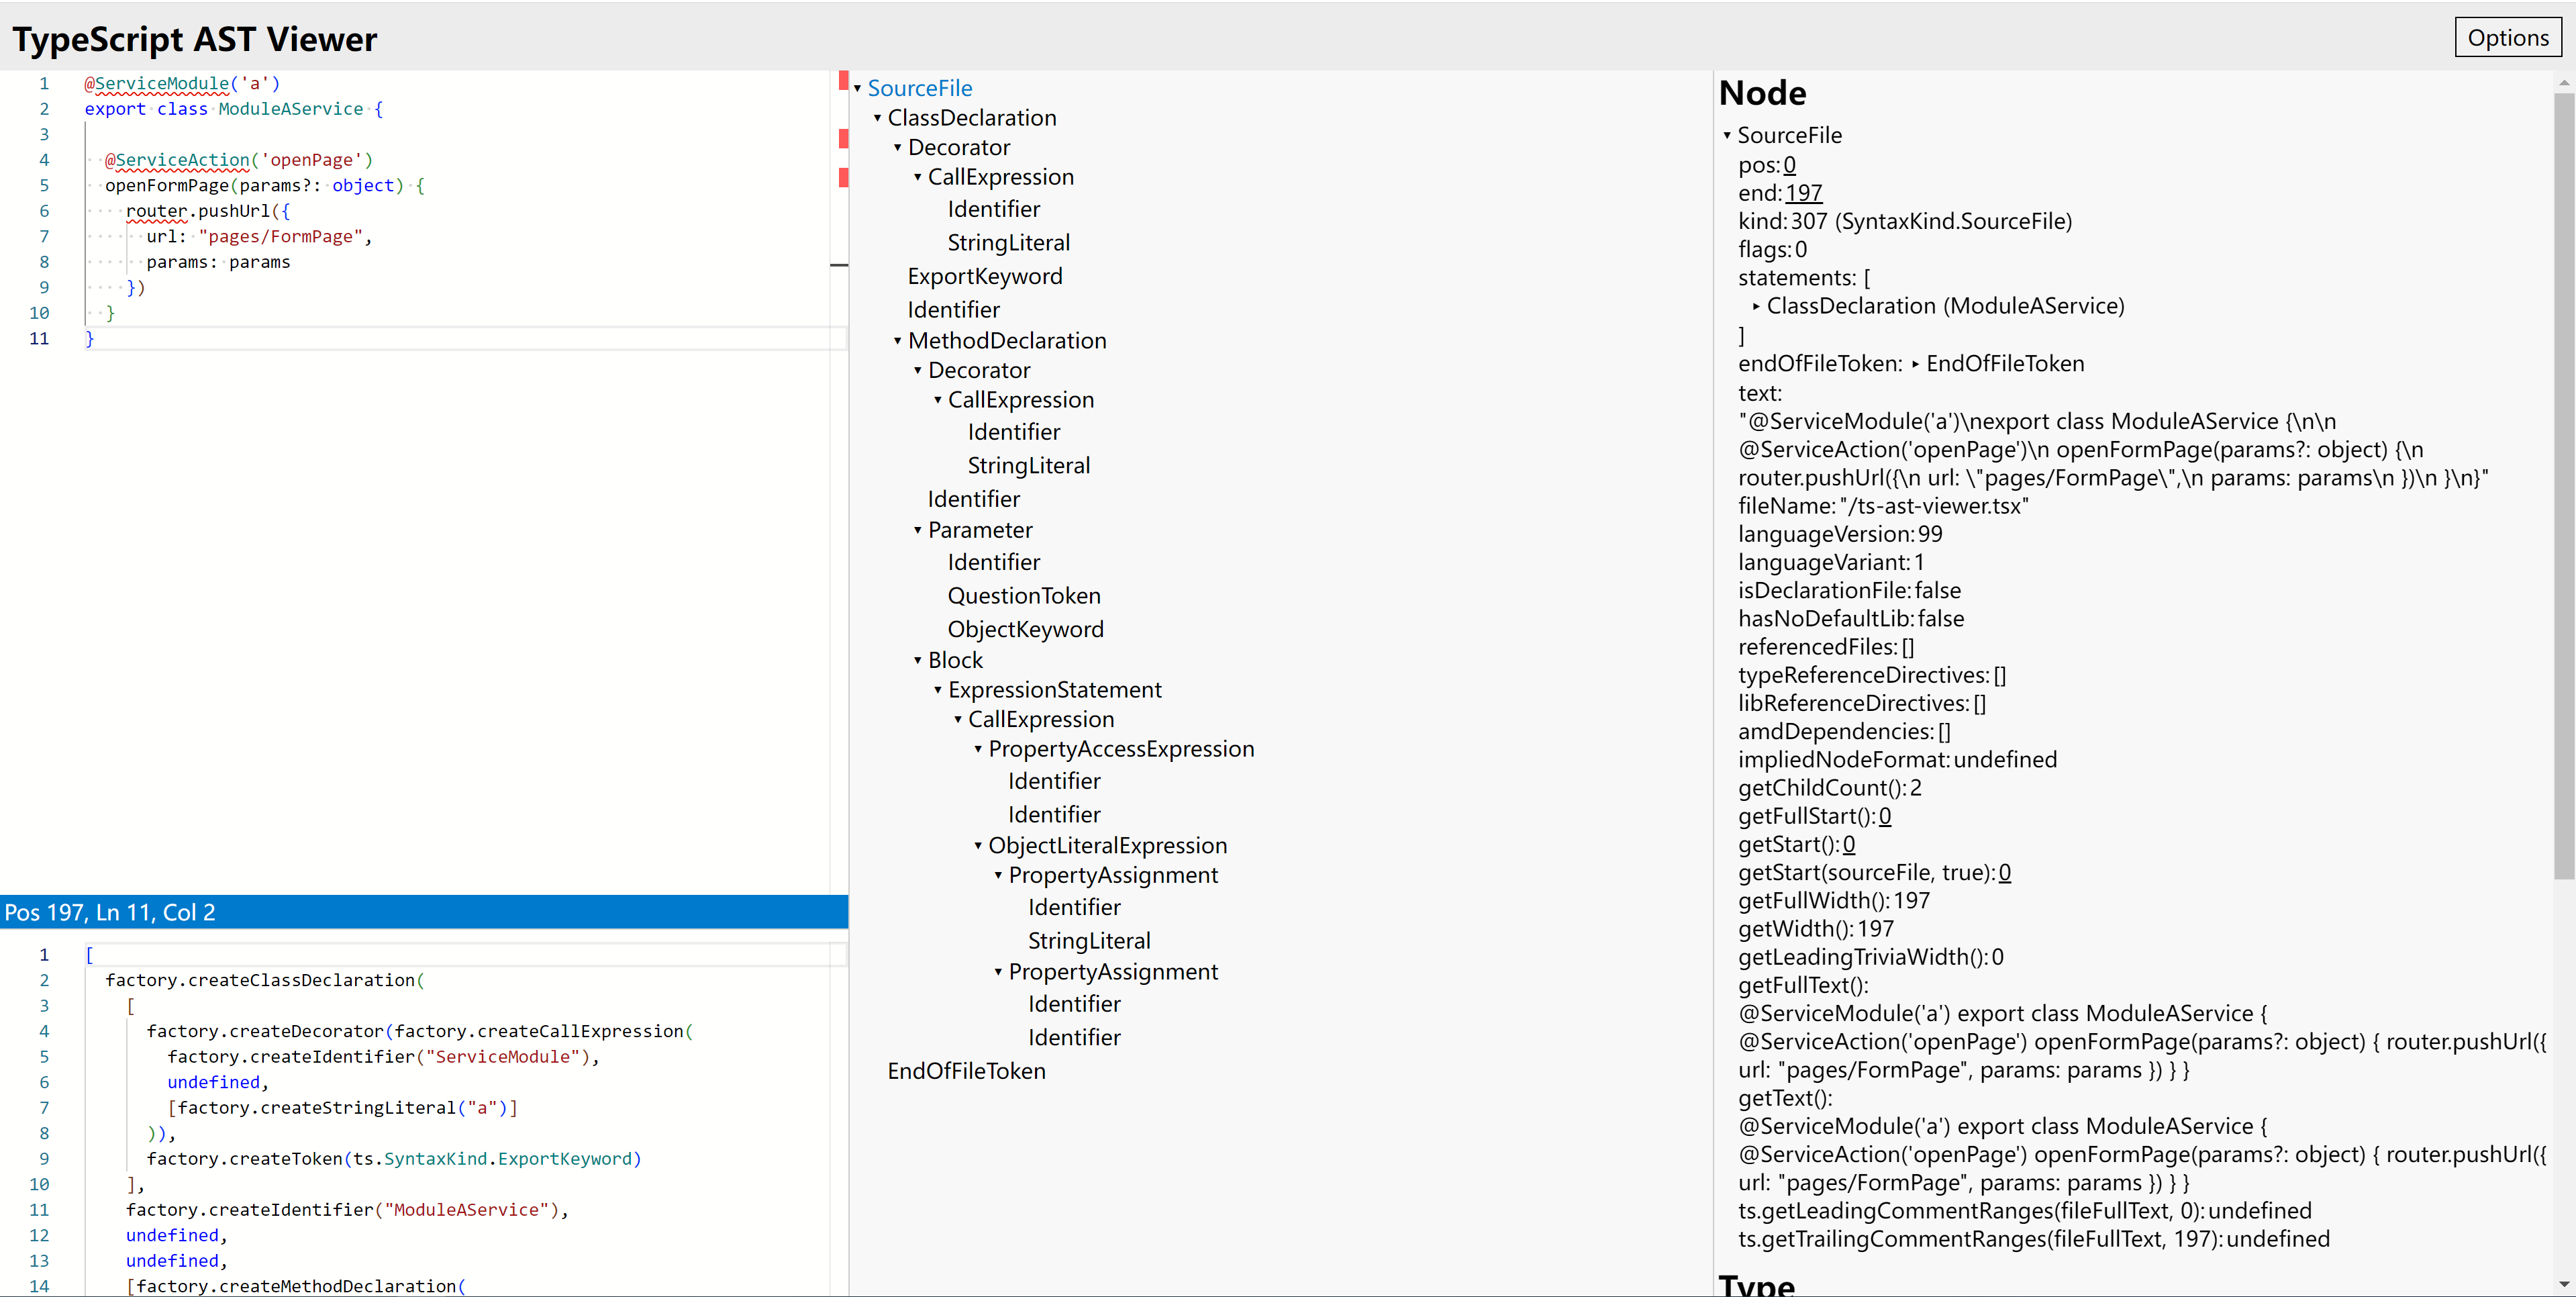
找到需要识别的文件,就可以通过文件的一些特征(一般会定义一些自定义的装饰器)来提取一些参数。这里可以采用AST解析或者是正则解析,推荐是使用AST解析的方式实现。
@ServiceModule('a')
export class ModuleAService {

  @ServiceAction('openPage')
  openFormPage(params?: object) {
    router.pushUrl({
      url: "pages/FormPage",
      params: params
    })
  }
}
对 ets 文件源码解析提取装饰器的相关数据:
const filePath = 'xxxx.ets'
const file = path.parse(filePath).name
const sourceCode = readFileSync(filePath, "utf-8");
const sourceFile = ts.createSourceFile(filePath, sourceCode, ts.ScriptTarget.ES2021, false);
ts.forEachChild(sourceFile, (node: ts.Node) => {
    // 解析装饰器定义和提取参数生成需要的数据
    if (node.kind == ts.SyntaxKind.ClassDeclaration) {
      let child = node as ts.ClassDeclaration
      // ... 省略解析代码
    }
    // ... 省略解析代码
})
这里有一个小技巧可以使用 https://ts-ast-viewer.com 这个网站来生成可视化的数据然后对着写解析代码就行了。
最终生成的数据,以下是示例:
[
    {
        'identifier': 'ModuleAService', /* 类名 */
        'file': 'services/ModuleA', /* 类所在文件相对路径 */
        'module': 'a', /* 模块标识名 */
        'actions': {
            'identifier': 'openFormPage', /* 方法名称 */
            'action': 'openPage' /* 动作名称 */
        }
    },
    {
        'identifier': 'ModuleBService',
        'file': 'services/ModuleB',
        'module': 'b',
        'actions': {
            'identifier': 'openFormPage',
            'action': 'openPage'
        }
    }
]
根据提取到的数据结合动态模板来生成模板代码。
{{#each pluginList}}
import { {{identifier}} } from './{{file}}';
{{/each}}

export default function execute(module: string, action: string, params: object[]) {
    switch (module) {
        {{#each pluginList}}
        case '{{module}}':
            execute{{module}}Service(module, action, params);
            break;
        {{/each}}
        default:
            throw new Error(`未知module: ${module}`);
    }
}

{{#each pluginList}}
function execute{{module}}Service(module: string, action: string, params: object[]) {
    const plugin = new {{identifier}}();
    switch (action) {
        {{#each actions}}
        case '{{action}}':
            plugin.{{identifier}}(params);
            break;
        {{/each}}
        default:
            throw new Error(`${module}未知action: ${action}`);
    }
}

{{/each}}
对模板进行编译解析生成具体的代码:
import path from 'path';
import Handlebars from "handlebars";
import { writeFileSync, readFileSync } from "fs";

export function compileTemplate(templatePath: string, data: any, outputPath: string) {
    const tpl = readFileSync(templatePath, { encoding: "utf8" });
    const template = Handlebars.compile(tpl);
    const output = template(data);
    writeFileSync(outputPath, output, { encoding: "utf8" });
}
到这里就基本上实现了一个代码生成器,在一定程度上可以实现“代码动态调用”。
使用
1、打包项目
因为目前只是开发阶段所以不必要每次都发布到npm仓库里面去,一般情况下我都倾向于在本地打包然后直接添加本地依赖的方式使用。
npm pack
执行上面的命令会在项目根目录下面生成一个
项目名称-版本号.tgz的文件(如: hvigor_demo_plugin-0.1.0.tgz)
2、在 hvigor\hvigor-config.json5 添加如下配置
"dependencies": {
    "@zengjing/hvigor_demo_plugin": "file:../dependencies/hvigor_demo_plugin-0.1.0.tgz"
}
让添加的dependencies生效的方法:
-
方式1:执行编辑区右上角 Install Now 或执行菜单 File -> Sync and Refresh Project 进行工程 Sync 后,DevEco Studio 将会根据 hvigor-config.json5 中的依赖配置自动安装。
-
方式2:执行
hvigorw --sync命令。
说明:每次改动新功能之后建议将版本号进行调整然后重新打包,避免因为缓存的原因导致不生效。
3、在 hvigorfile.ts 中导入插件
import { customPlugin } from '@zengjing/hvigor_demo_plugin';

export default {
    system: appTasks,
    plugins:[
        customPlugin()
    ]
}
4、执行运行项目插件就会自动生效了,可以在build日志中查看是否生效